
At GitLab B.V. we are working on an infrastructure upgrade to give more CPU
power and storage space to GitLab.com. (We are currently still running on a
single server.) As a
part of this upgrade we wanted to move gitlab.com from our own dedicated
hardware servers to an AWS data center 400 kilometers away. In this blog post
I will tell you how I did that and what challenges I had to overcome. An epic
adventure of hand-rolled network tunnels, advanced DRBD features and streaming
9TB of data through SSH pipes!
What did I have to move?
In our current setup we run a stock GitLab Enterprise Edition omnibus package,
with a single big filesystem mounted at /var/opt/gitlab. This
filesystem holds all the user data hosted on gitlab.com: Postgres and Redis
database files, user uploads, and a lot of Git repositories. All I had to do
to move this data to AWS is to move the files on this filesystem. Sounds simple
enough, does it not?
So do we move the files, or the filesystem itself? This is an easy question to
answer. Moving the files using something like Rsync is not an option because it
is just too slow. We do file-based backups every week where we take a block
device snapshot, mount the snapshot and send it across with Rsync. That
currently takes over 24 hours, and 24 hours of downtime while we move
gitlab.com is not a nice idea. Now you might ask: what if you Rsync once to
prepare, take the server offline, and then do a quick Rsync just to catch up?
That would still take hours just for Rsync to walk through all the files and
directories on disk. No good.
We have faced and solved this same problem in the past when the amount of data
was 5 times smaller. (Rsync was not an option even then.) What I did at that
time was to use DRBD to move not just the files themselves, but the whole
filesystem they sit on. This time around DRBD again seemed like the best
solution for us. It is not the fastest solution to move a lot of data, but what
is great about it is that you can keep using the filesystem while the data is
being moved, and changes will get synchronized continuously. No downtime for
our users! (Except maybe 5 minutes at the start to set up the sync.)
What is DRBD?
DRBD is a system that can create a virtual hard drive
(block device) on a Linux computer that gets mirrored across a network
connection to a second Linux computer. Both computers give a 'real' hard drive
to DRBD, and DRBD keeps the contents of the real hard drive the same across
both computers via the network. One of the two computers gets a virtual hard
drive from DRBD, which shows the contents of the real hard drive underneath. If
your first computer crashes, you can 'plug in' the virtual hard drive on the
second computer in a matter of seconds, and all your data will still be there
because DRBD kept the 'real' hard drives in sync for you. You can even have the
two computers that are linked by DRBD sit in different buildings, or on
different continents. Up until our move to AWS, we were using DRBD to protect
against hardware failure on the server that runs gitlab.com: if such a failure
would happen, we could just plug in the virtual hard drive with the user data
into our stand-by server. In our new data center, the hosting provider (Amazon
Web Services) has their own solution for plugging virtual hard drives in and
out called Elastic Block Storage, so we are no longer using DRBD as a virtual
hard drive. From an availability standpoint this is not better or worse, but
using EBS drives does make it a lot easier for us to make backups because now
we can just store snapshots (no more Rsync).
Using DRBD for a data migration
Although DRBD is not really made for this purpose, I felt confident using DRBD
for the migration because I had done it before for a migration between data
centers. At that time we were moving across the Atlantic Ocean; this time we
would only be moving from the Netherlands to Germany. However, the last time
we used DRBD only as a one-off tool. In our pre-migration setup, we were
already using DRBD to replicate the filesystem between two servers in the same
rack. DRBD only lets you share a virtual hard drive between two computers, so
how do we now send the data to a third computer in the new data center?
Luckily, DRBD actually has a trick up its sleeve to deal with this, called
'stacked resources'. This means that our old servers ('linus' and 'monty')
would share a virtual hard drive called 'drbd0', and that whoever of the two
has the 'drbd0' virtual hard drive plugged in gets to use 'drbd0' as the 'real'
hard drive underneath a second virtual hard drive, called 'drbd10', which is
shared with the new server ('theo'). Also see the picture below.
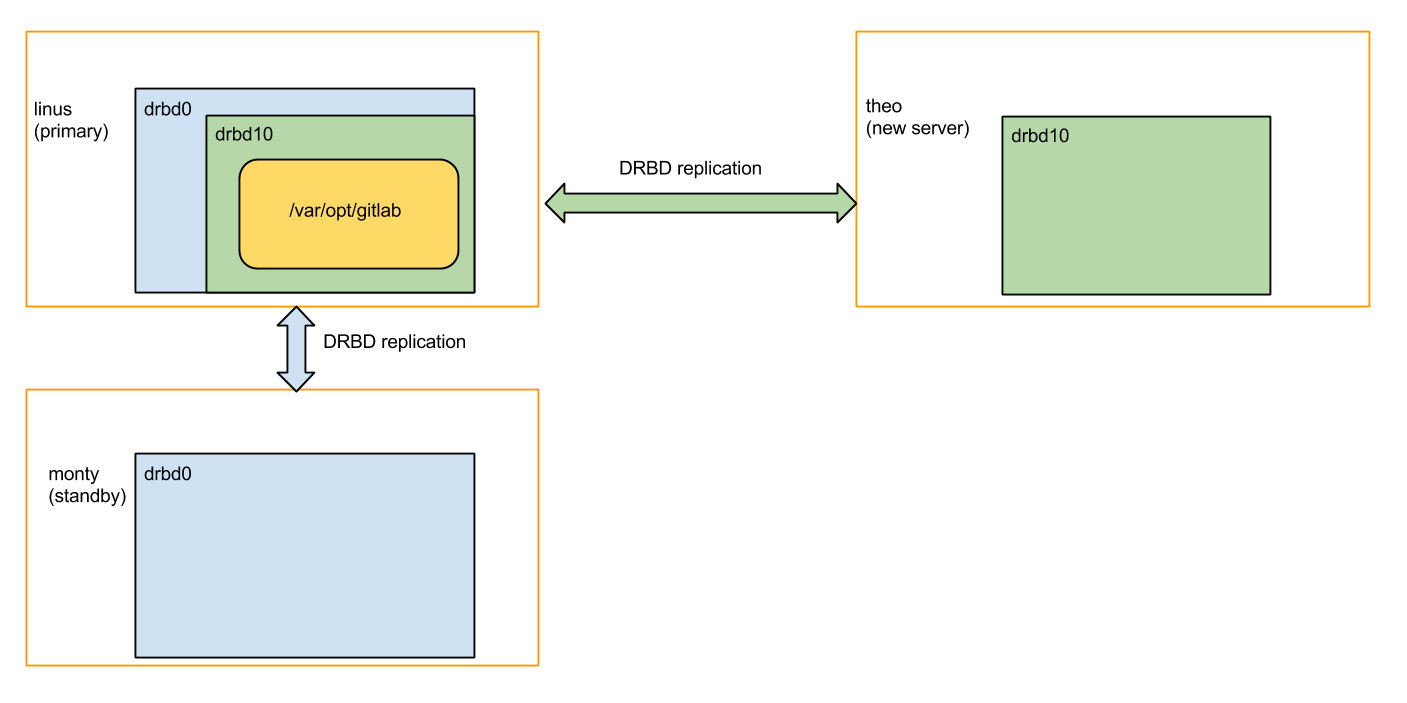
If linus would malfunction, we could attach drbd0 (the blue virtual hard drive)
on monty and keep gitlab.com going. The 'green' replication (to get the data to
theo) would also be able to continue, even after a failover to monty.
Networking
I liked the picture above, so 'all' I had to do was set it up. That ended up
taking a few days, just to set up a test environment, and to figure out how to
create a network tunnel for the green traffic. The network tunnel needed to
have a movable endpoint depending on whether linus or monty was primary. We
also needed the tunnel because DRBD is not compatible with the Network Address
Translation used by
AWS. DRBD assumes that whenever a node listens on an IP address, it is also
reachable for its partner node at that IP address. On AWS on the other hand, a
node will have one or more internal IP addresses, which are distinct from its
public IP address.
We chose to work around this with an IPIP
tunnel and manually keyed IPsec
encryption. Previous experiments indicated that this gave us the best network
throughput compared to OpenVPN and GRE tunnels.
To set up the tunnel I used a shell script that was kept in sync on all three
servers involved in the migration by Chef.
# Network tunnel configuration script used by GitLab B.V. to migrate data from
# Delft to Frankfurt

#!/bin/sh
set -u

PATH=/usr/sbin:/sbin:/usr/bin:/bin

frankfurt_public=54.93.71.23
frankfurt_replication=172.16.228.2
test_public=54.152.127.180
test_replication=172.16.228.1
delft_public=62.204.93.103
delft_replication=172.16.228.1

create_tunipip() {
  if ! ip tunnel show | grep -q tunIPIP ; then
    echo Creating tunnel tunIPIP
    ip tunnel add tunIPIP mode ipip ttl 64 local "$1" remote "$2"
  fi
}

add_tunnel_address() {
  if ! ip address show tunIPIP | grep -q "$1" ; then
    ip address add "$1/32" peer "$2/32" dev tunIPIP
  fi
}

case $(hostname) in
  ip-10-0-2-9)
    create_tunipip 10.0.2.140 "${frankfurt_public}"
    add_tunnel_address "${test_replication}" "${frankfurt_replication}"
    ip link set tunIPIP up
    ;;
  ip-10-0-2-245)
    create_tunipip 10.0.2.11 "${frankfurt_public}"
    add_tunnel_address "${test_replication}" "${frankfurt_replication}"
    ip link set tunIPIP up
    ;;
  ip-10-1-0-52|theo.gitlab.com)
    create_tunipip 10.1.0.52 "${delft_public}"
    add_tunnel_address "${frankfurt_replication}" "${delft_replication}"
    ip link set tunIPIP up
    ;;
  linus|monty)
    create_tunipip "${delft_public}" "${frankfurt_public}"
    add_tunnel_address "${delft_replication}" "${frankfurt_replication}"
    ip link set tunIPIP up
    ;;
esac
This script was configured to run on boot. Note that it covers our Delft nodes
(linus and monty, then current production), the node we were migrating to in
Frankfurt (theo), and two AWS test nodes that were part of a staging setup. We
chose the AWS Frankfurt (Germany) data center because of its geographic
proximity to Delft (The Netherlands).
We configured IPsec with /etc/ipsec-tools.conf. An example for the 'origin'
configuration would be:
#!/usr/sbin/setkey -f

# Configuration for 172.16.228.1

# Flush the SAD and SPD
flush;
spdflush;

# Attention: Use this keys only for testing purposes!
# Generate your own keys!

# AH SAs using 128 bit long keys
# Fill in your keys below!
add 172.16.228.1 172.16.228.2 ah 0x200 -A hmac-md5 0xfoobar;
add 172.16.228.2 172.16.228.1 ah 0x300 -A hmac-md5 0xbarbaz;

# ESP SAs using 192 bit long keys (168 + 24 parity)
# Fill in your keys below!
add 172.16.228.1 172.16.228.2 esp 0x201 -E 3des-cbc 0xquxfoo;
add 172.16.228.2 172.16.228.1 esp 0x301 -E 3des-cbc 0xbazqux;

# Security policies
# outbound traffic from 172.16.228.1 to 172.16.228.2
spdadd 172.16.228.1 172.16.228.2 any -P out ipsec esp/transport//require ah/transport//require;

# inbound traffic from 172.16.228.2 to 172.16.228.1
spdadd 172.16.228.2 172.16.228.1 any -P in ipsec esp/transport//require ah/transport//require;
Getting the networking to this point took quite some work. For starters, we did
not have a staging environment similar enough to our production environment, so
I had to create one for this occasion.
On top of that, to model our production setup, I had to use an AWS 'Virtual
Private Cloud', which was new technology for us. It took a while before I
found some vital information about using multiple IP
addresses
that was not obvious from the AWS documentation: if you want to have two public
IP addresses on an AWS VPC node, you need to put two corresponding private IP
addresses on one 'Elastic Network Interface', instead of creating two network
interfaces with one private IP each.
Configuring three-way DRBD replication
With the basic networking figured out the next thing I had to do was to adapt
our production failover script so that we maintain redundancy while migrating
the data. 'Failover' is a procedure where you move a service (gitlab.com) ove
to a different computer after a failure. Our failover procedure is managed by a
script. My goal was to make sure that if one of our production servers failed,
any teammate of mine on pager duty would be able to restore the gitlab.com
service using our normal failover procedure. That meant I had to update the
script to use the new three-way DRBD configuration.
I certainly got a little more familiar with tcpdump (tcpdump -n -i INTERFACE), having multiple layers of firewalls
(UFW and AWS Security
Groups),
and how to get any useful log messages from DRBD:
# Monitor DRBD log messages
sudo tail -f /var/log/messages | grep -e drbd -e d-con
I later learned that I actually deployed a new version of the failover script
with a bug in it that potentially could have confused the hell out of my
teammates had they had to use it under duress. Luckily we never actually needed
the failover procedure during the time the new script was in production.
But, even though I was introducing new complexity and hence bugs into our
failover tooling, I did manage to learn and try out enough things to bring this
project to a successful conclusion.
Enabling the DRBD replication
This part was relatively easy. I just had to grow the DRBD block device
'drbd0' so that it could accommodate the new stacked (inner) block device
'drbd10' without having to shrink our production filesystem. Because drbd0 was
backed by LVM and we had some space left this was a matter of invoking
lvextend and drbdadm resize on both our production nodes.
The step after this was the first one where I had to take gitlab.com offline.
In order to 'activate' drbd10 and start the synchronization, I had to unmount
/dev/drbd0 from /var/opt/gitlab and mount /dev/drbd10 in its place. This
took less than 5 minutes. After this the actual migration was under way!
Too slow
At this point I was briefly excited to be able to share some good news with the
rest of the team. While staring about the DRBD progress bar for the
synchronization I started to realize however that the progress bar was telling
me that the synchronization would take about 50-60 days at 2MB/s.
This prognosis was an improvement over what we would expect based on our
previous experience moving 1.8TB from North Virginia (US) to Delft (NL) in
about two weeks (across the Atlantic Ocean!). If one would extrapolate that
rate you would expect moving 9TB to take 70 days. We were disappointed
nonetheless because we were hoping that we would gain more throughput by moving
over a shorter distance this time around (Delft and Frankfurt are about 400km
apart).
The first thing I started looking into at this point was whether we could
somehow make better use of the network bandwidth at our disposal. Sending fake
data (zeroes) over the (encrypted) IPIP tunnel (dd if=/dev/zero | nc remote_ip 1234) we could get about 17 MB/s. By disabling IPsec (not really an option as
far as I am concerned) we could increase that number to 40 MB/s.
The only conclusion I could come to was that we were not reaching our maximum
bandwidth potential, but that I had no clue how to coax more speed out of the
DRBD sync. Luckily I recalled reading about another magical DRBD feature.
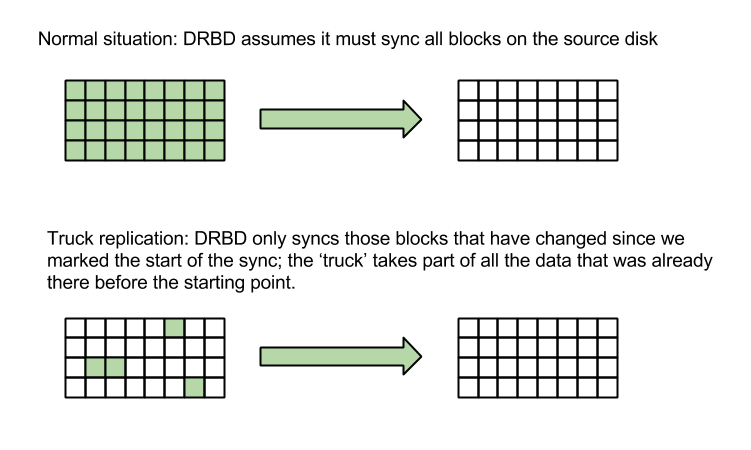
Bring out the truck
The solution suggested by the DRBD documentation for situations like ours is
called 'truck based
replication.
Instead of synchronizing 9TB of data, we would be telling DRBD to mark a point
in time, take a full disk snapshot, move the snapshot to the new location (as a
box full of hard drives in a truck if needed), and then tell DRBD to get the
data at the new location up to date. During that 'catching-up' sync, DRBD would
only be resending those parts of the disk that actually changed since we marked
the point in time earlier. Because our users would not have written 9TB of new
data while the 'disks' were being shipped, we would have to sync much less than
9TB.
In our case I would not have to use an actual truck; while testing the network
throughput between our old and new server I found that I could stream zeroes
through SSH at about 35MB/s.
dd if=/dev/zero bs=1M count=100 | ssh theo.gitlab.com dd of=/dev/null
After doing some testing with the leftover two-node staging setup I built
earlier to figure out the networking I felt I could make this work. I followed
the steps in the DRBD documentation, made an LVM snapshot on the active origin
server, and started sending the snapshot to the new server with the following
script.
#!/bin/sh
block_count=100
block_size='8M'
remote='54.93.71.23'

send_blocks() {
  for skip in $(seq $1 ${block_count} $2) ; do
    echo "${skip}   $(date)"
    sudo dd if=/dev/gitlab_vg/truck bs=${block_size} count=${block_count} skip=${skip} status=noxfer iflag=fullblock \
    | ssh -T ${remote} sudo dd of=/dev/gitlab_vg/gitlab_com bs=${block_size} count=${block_count} seek=${skip} status=none iflag=fullblock
  done
}

check_blocks() {
  for skip in $(seq $2 ${block_count} $3) ; do
    printf "${skip}   "
    sudo dd if=$1 bs=${block_size} count=${block_count} skip=${skip} iflag=fullblock | md5sum
  done
}

case $1 in
  send)
    send_blocks $2 $3
    ;;
  check)
    check_blocks $2 $3 $4
    ;;
  *)
    echo "Usage: $0 (send START END) | (check BLOCK_DEVICE START END)"
    exit 127
esac
By running this script in a screen
session I was able to copy the LVM snapshot /dev/gitlab_vg/truck from the old
server to the new server in about 3.5 days, 800 MB at a time. The 800MB number
was a bit of a coincidence, stemming from the recommendation from our Dutch
hosters NetCompany to use 8MB dd-blocks. Also
coincidentally, the total disk size was divisible by 8MB. If you have an eye
for system security you might notice that the script needed both root
privileges on the source server, and via short-lived unattended SSH sessions
into the remote server (| ssh sudo ...). This is not a normal thing for us to
do, and my colleagues got spammed by warning messages about it while this
migration was in progress.
Because I am a little paranoid, I was running a second instance of this script
in parallel with the sync, where I was calculating MD5 checksums of all the
blocks that were being sent across the network. By calculating the same
checksums on the migration target I could gain sufficient confidence that all
data made across without errors. If there would have been any, the script would
have made it easy to re-send an individual 800MB block.
At this point my spirits were lifting again and I told my teammates we would
probably need one extra day after the 'truck' stage before we could start using
the new server. I did not know yet that 'one day' would become 'one week'.
Shipping too much data
After moving the big snapshot across the network with
dd and SSH, the next step would
be to 'just turn DRBD on and let it catch up'. But that did not work all of a
sudden! It took me a while to realize that the problem was that while trucking,
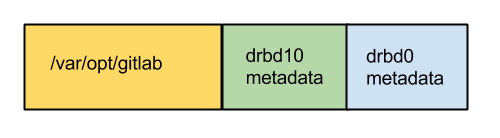
I had sent too much data to the new server (theo). If you recall the picture
I drew earlier of the three-way DRBD replication then you can see that the goal
was to replicate the 'green box' from the old servers to the new server, while
letting the old servers keep sharing the 'blue box' for redundancy.

But I had just sent a snapshot of the blue box to theo (the server on the
right), not just the green box. DRBD was refusing to turn back on theo,
because it was expecting the green box, not the blue box (containing the green
box). More precisely, my disk on the new server contained metadata for drbd0 as
well as drbd10. DRBD finds its metadata by starting at the end of the disk and
walking backwards. Because of that, it was not seeing the drbd10 (green)
metadata on theo.
The first thing I tried was to shrink the disk (with
LVM) so that
the blue block at the end would fall off. Unfortunately, you can only grow and
shrink LVM disks in fixed steps (4MB steps in our case), and those steps did
not align with where the drbd10 metadata (green box) ended on disk.
The next thing I tried was to erase the blue block. That would leave DRBD
unable to find any metadata, because DRBD metadata must sit at the end of the
disk. To cope with that I tried and trick DRBD into thinking it was in the
middle of a disk resize operation. By manually creating a doctored
/var/lib/drbd/drbd-minor-10.lkbd file used by DRBD when it does a
(legitimate) disk resize, I was pointing it to where I thought it could find
the green block of drbd10 metadata. To be honest this required more disk sector
arithmetic than I was comfortable with. Comfortable or not, I never got this
procedure to work without a few screens full of scary DRBD error messages so I
decided to call our first truck expedition a bust.
One last try
We had just spent four days waiting for a 9TB chunk of data to be transported
to our new server only to find out that it was getting rejected by DRBD. The
only option that seemed left to us was to sit back and wait 50-60 days for a
regular DRBD sync to happen. There was just this one last thing I wanted to try
before giving up. The stumbling block at this point was getting DRBD on theo to
find the metadata for the drbd10 disk. From reading the documentation, I knew
that DRBD has metadata export and import commands. What if we would take a new
LVM snapshot in Delft, take the disk offline and export its metadata, and then
on the other hand do a metadata import with the proper DRBD import command
(instead of me writing zeroes to the disk and lying to DRBD about being in the
middle of a resize). This would require us to redo the truck dance and wait
four days, but four days was still better than 50 days.
Using the staging setup I built at the start of this process (a good time
investment!) I created a setup that allowed me to test three-way replication
and truck-based replication at the same time. Without having to do any
arithmetic I came up with an intimidating but reliable sequence of commands to
(1) initiate truck based replication and (2) export the DRBD metadata.
sudo lvremove -f gitlab_vg/truck
## clear the bitmap to mark the sync point in time
sudo drbdadm disconnect --stacked gitlab_data-stacked
sudo drbdadm new-current-uuid --clear-bitmap --stacked gitlab_data-stacked/0
## create a metadata dump
echo Yes | sudo gitlab-drbd slave
sudo drbdadm primary gitlab_data
sudo drbdadm apply-al --stacked gitlab_data-stacked
sudo drbdadm dump-md --stacked gitlab_data-stacked > stacked-md-$(date +%s).txt
## Create a block device snapshot
sudo lvcreate -n truck -s --extents 50%FREE gitlab_vg/drbd
## Turn gitlab back on
echo Yes |sudo gitlab-drbd slave
echo Yes |sudo gitlab-drbd master
## Make sure the current node will 'win' as primary later on
sudo drbdadm new-current-uuid --stacked gitlab_data-stacked/0
This time I needed to take gitlab.com offline for a few minutes to be able to
do the metadata export. After that, a second waiting period of 4 days of
streaming the disk snapshot with dd and ssh commenced. And then came the
big moment of turning DRBD back on theo. It worked! Now I just had to wait
for the changes on disk of the last four days to be replicated (which took
about a day) and we were ready to flip the big switch, update the DNS and start
serving gitlab.com from AWS. That final transition took another 10 minutes of
downtime, and then we were done.
Looking back
As soon as we flipped the switch and started operating out of AWS/Frankfurt,
gitlab.com became noticeably more responsive. This is in spite of the fact that
we are still running on a single server (an AWS
c3.8xlarge instance at the
moment).
Counting from the moment I was tasked to work on this data migration, we were
able to move a 9TB filesystem to a different data center and hosting provider
in three weeks, requiring 20 minutes of total downtime (spread over three
maintenance windows). We took an operational risk of prolonged downtime due to
operator confusion in case of incidents, by deploying a new configuration that
while tested to some degree was understood by only one member of the operations
team (myself). We were lucky that there was no incident during those three
weeks that made this lack of shared knowledge a problem.
Now if you will excuse me I have to go and explain to my colleagues how our
new gitlab.com infrastructure on AWS is set up. :)